Using Comfy (free, open source, local install)
ComfyUI is a user interface framework designed to streamline the development of intuitive and visually cohesive graphical user interfaces (GUIs) for software applications. It provides developers with a suite of pre-built components—such as buttons, sliders, and text fields—along with tools for customization and event handling. By abstracting much of the complexity involved in UI design, ComfyUI enables the creation of professional, user-friendly interfaces with greater efficiency, even for those with limited expertise in front-end development. Its focus on simplicity and functionality makes it a valuable resource for enhancing the usability and aesthetic quality of software applications.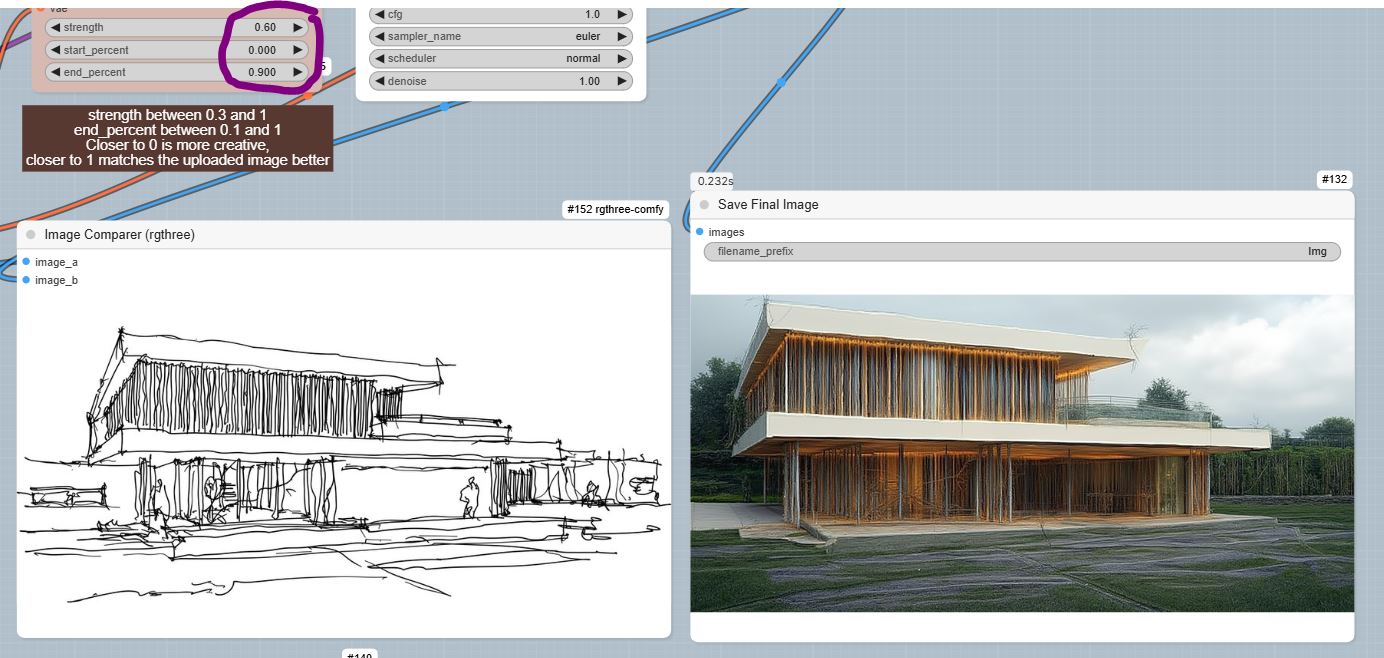
ComfyUI can be installed on a personal computer, allowing users to create and manage graphical user interfaces (GUIs) independently, without relying on external platforms or cloud services. This makes it a self-contained solution for developers or designers who need to build and test interfaces locally.
Installation and Independence:
- Local Installation: ComfyUI can be downloaded and installed directly on a computer, providing a standalone environment for UI development.
- Offline Use: Once installed, it operates independently, meaning one don’t need an internet connection to use it (unless specific features require online resources).
- Customization: Being a local platform, it allows full control over the development process, enabling customization and integration with other tools or frameworks.
Technical Requirements:
To run ComfyUI effectively, the computer should meet the following general requirements (specifics may vary depending on the version and complexity of your projects):
- Processor (CPU): A modern multi-core processor (e.g., Intel i5, i7, or AMD Ryzen 5, 7) is recommended for smooth performance.
- Graphics Card (GPU): While not always mandatory, a dedicated GPU: nVidia RTX with a minimum of 8Go RAM, especially for rendering complex interfaces or animations.
- Memory (RAM): At least 32 GB of RAM is recommended, though 64 GB or more is ideal for handling larger projects or multitasking.
- Storage: A minimum of 500 MB to 1 GB of free storage space on SSD is required for installation, though additional space may be needed for project files and assets.
- Operating System: ComfyUI is often compatible with major operating systems like Windows (10/11), (macOS (latest versions)), and Linux (Ubuntu, Fedora, etc.).
- Dependencies: Comfy UI requires additional software, such as Python, Node.js, or specific libraries, depending on the framework’s implementation.
By meeting these requirements, one can ensure a smooth and efficient experience while using ComfyUI to design and develop user interfaces on personal computer.
Download ComfyUI
https://stable-diffusion-art.com/comfyui/
Creating an image
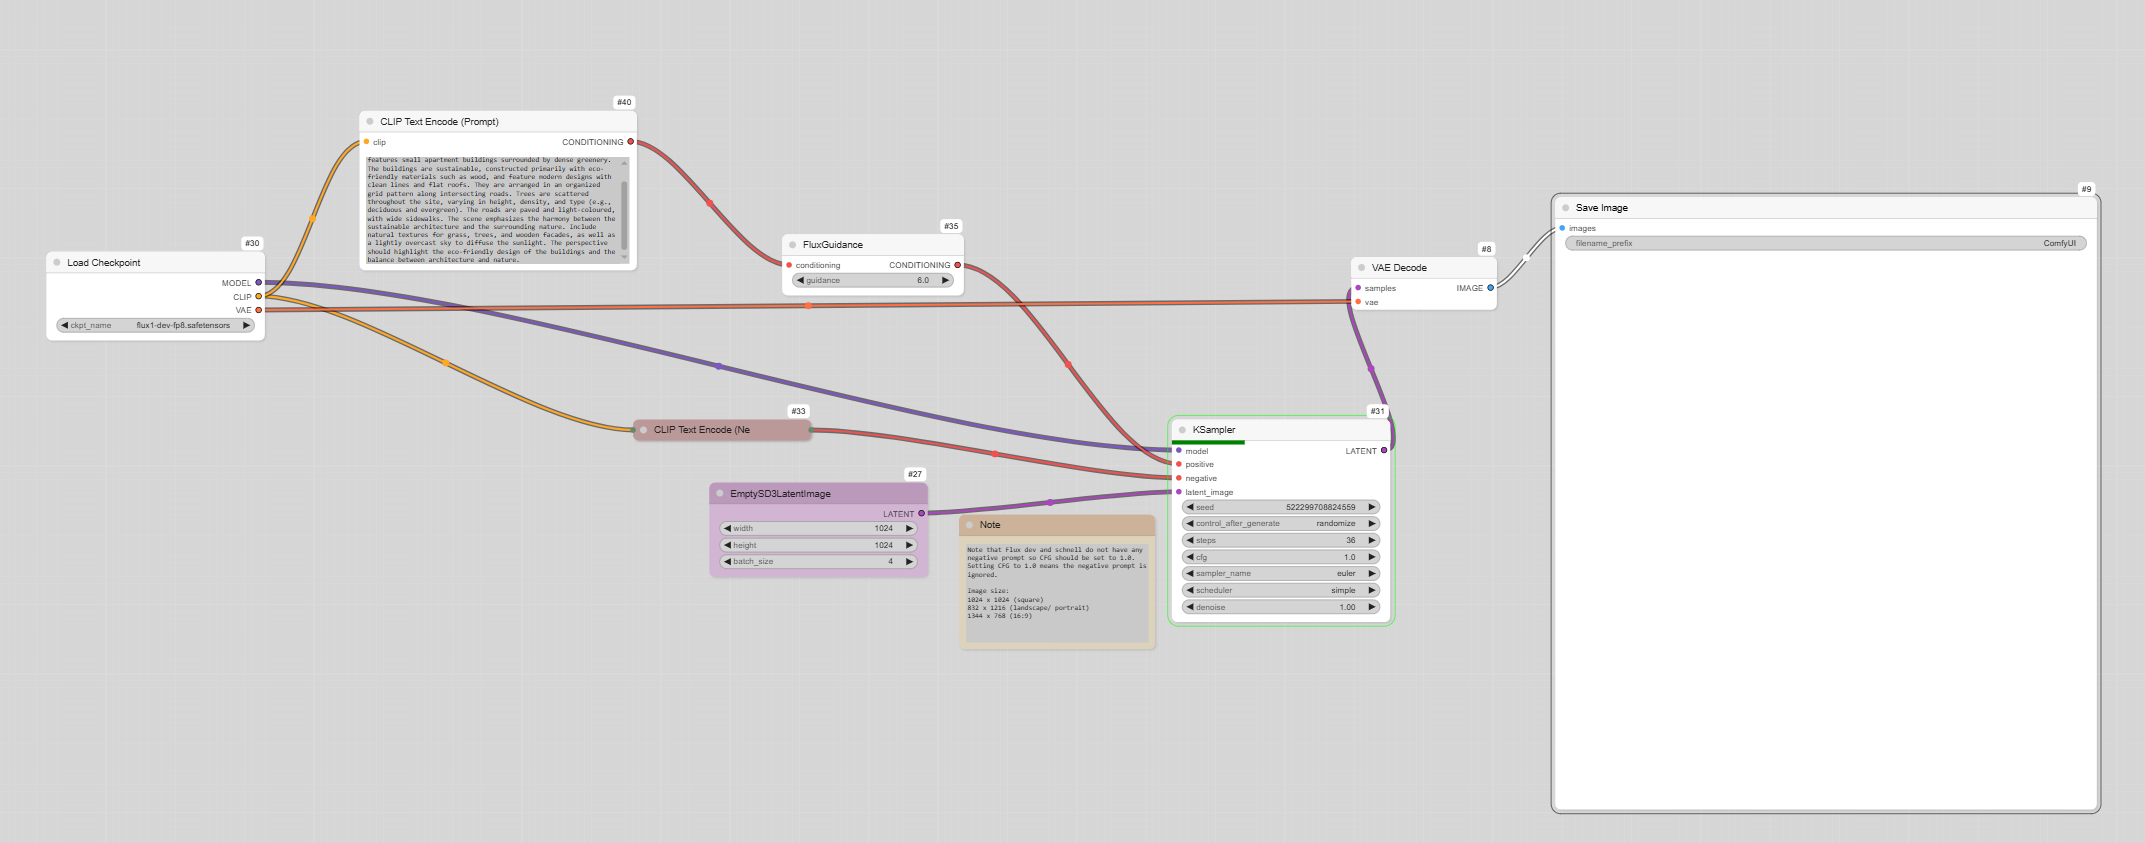
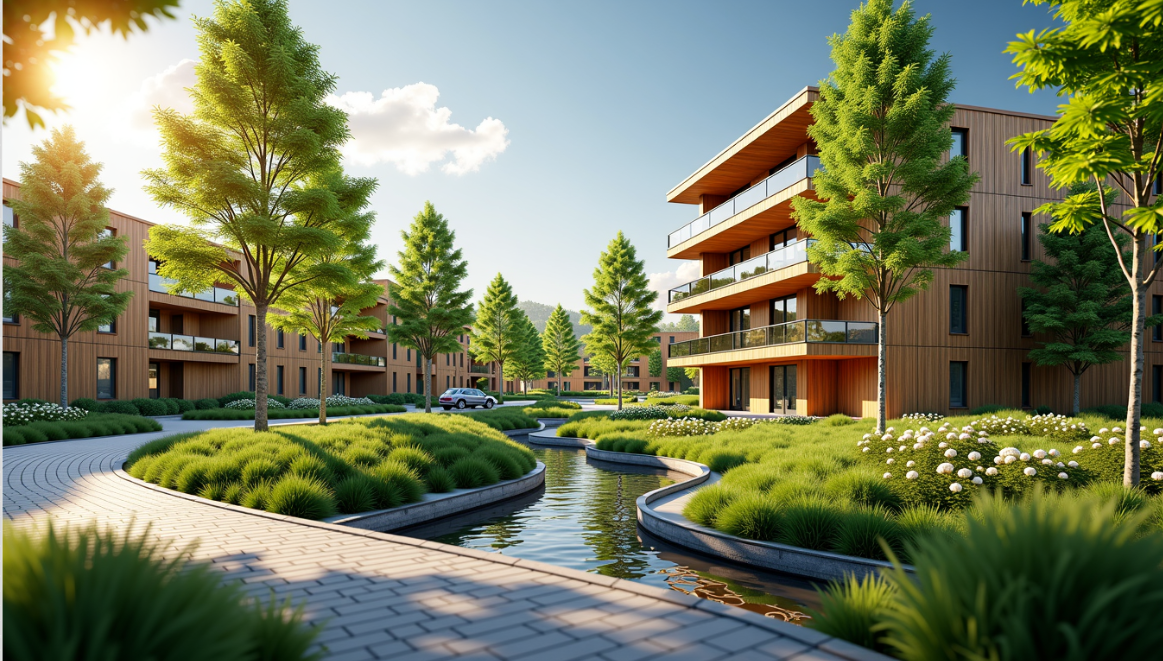
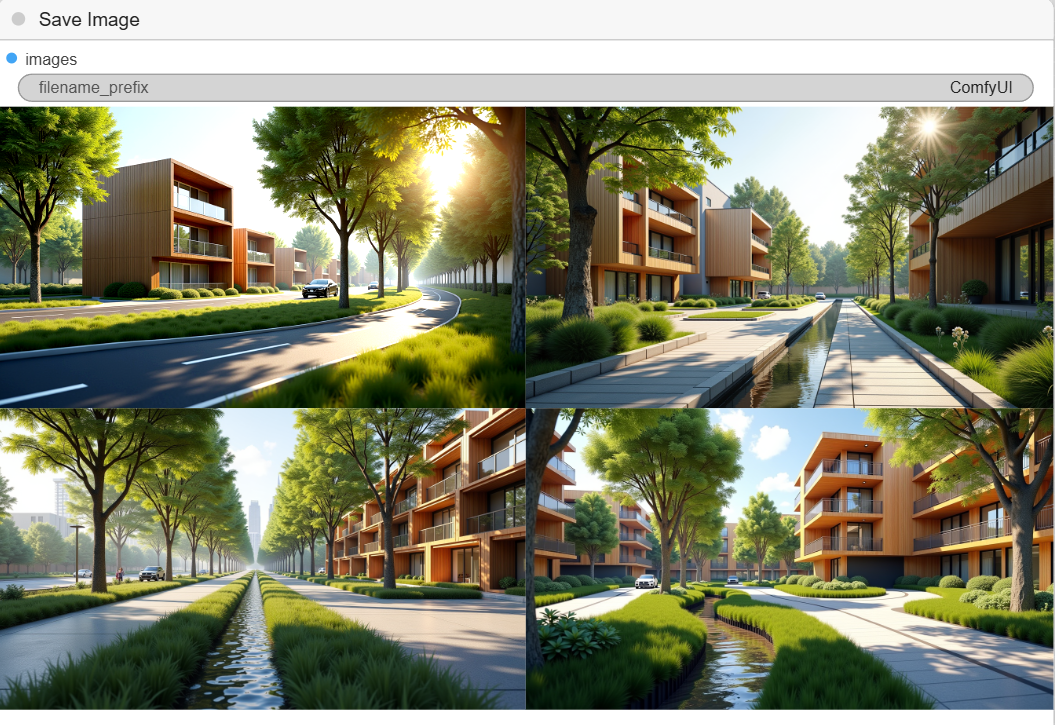
To create an image, a basic definition, and the prompt is similar to the one used online above.
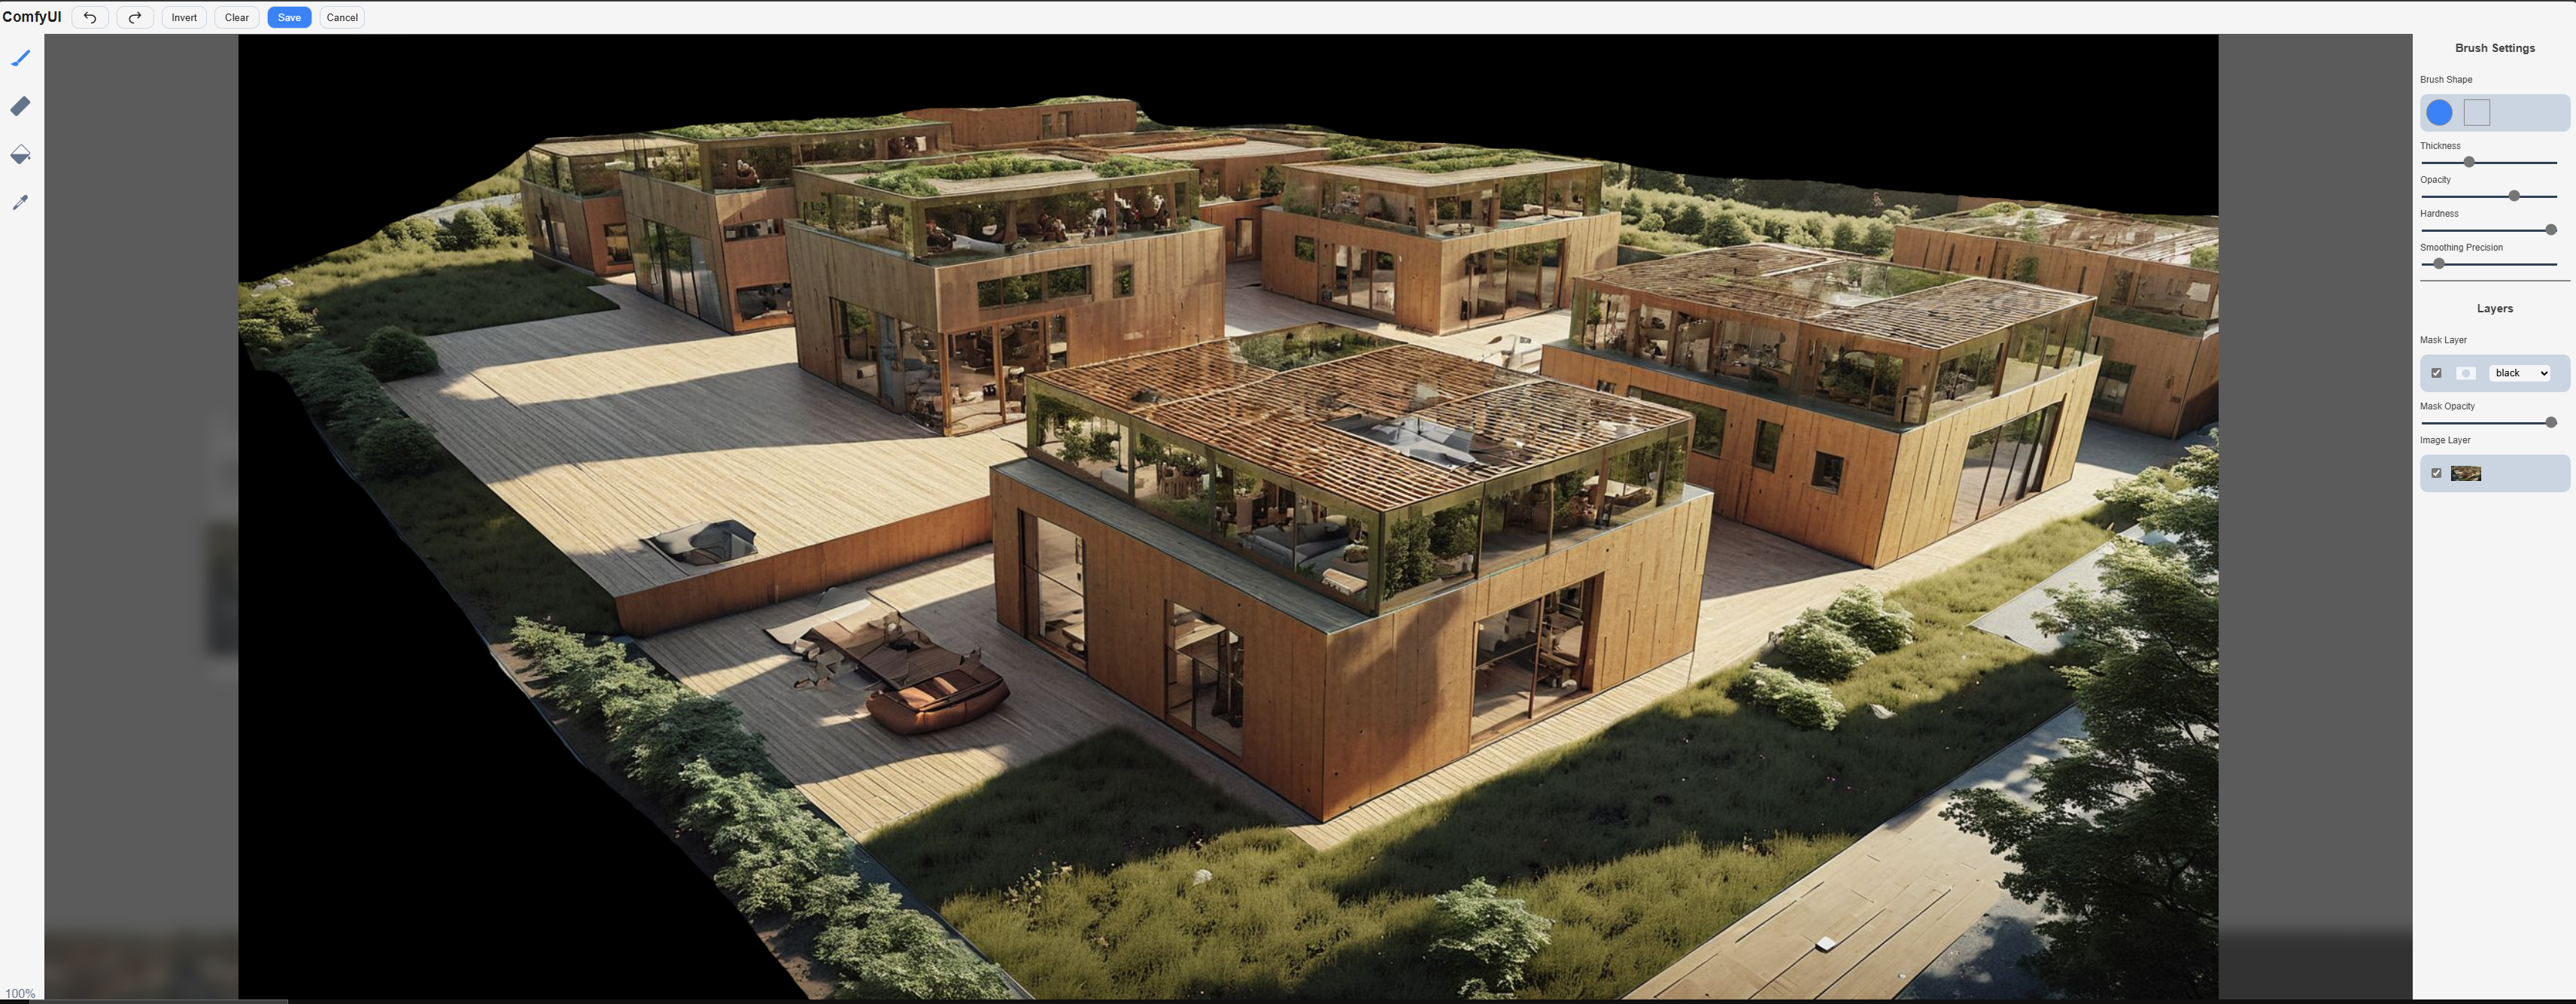
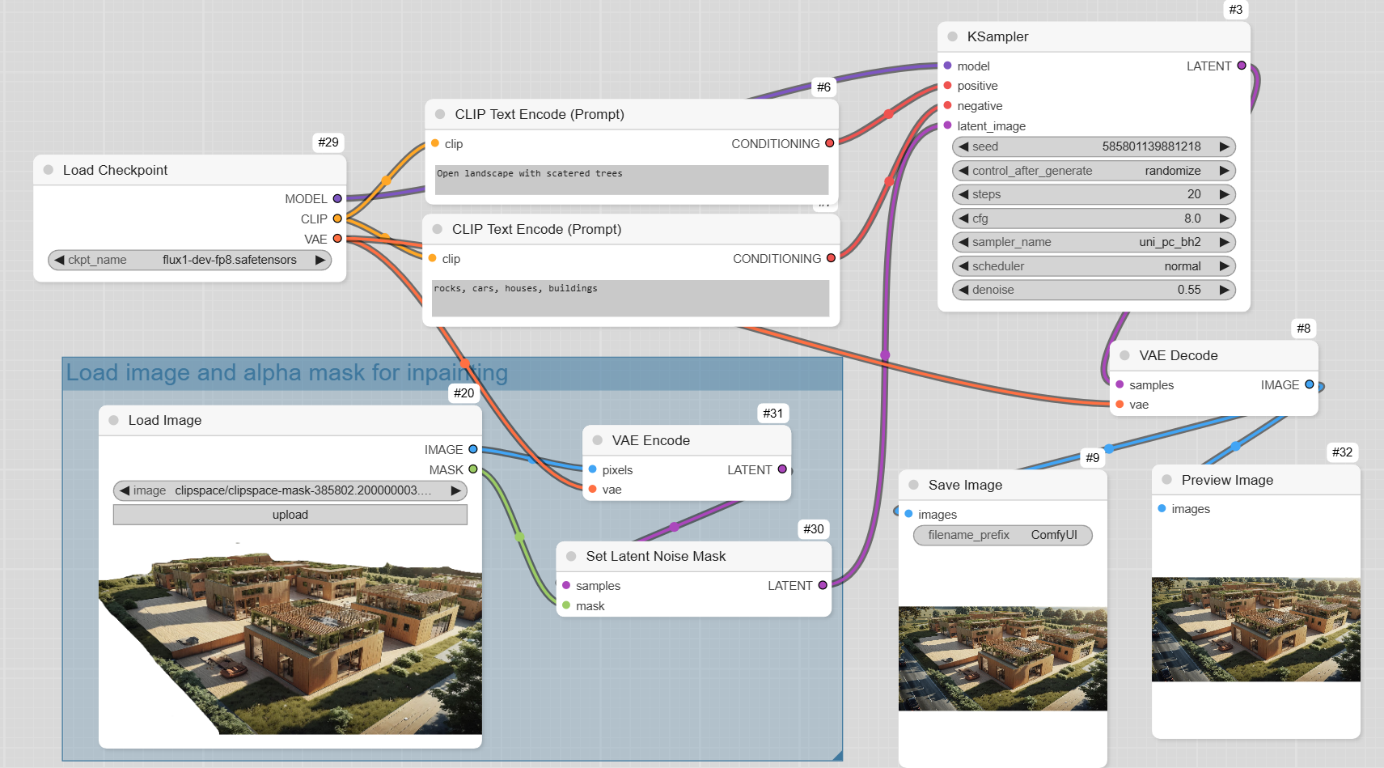
Inpainting
Inpainting is a technique used in image editing and generation to reconstruct or fill in missing or damaged parts of an image. When using ComfyUI, inpainting can be integrated into workflows for tasks like photo restoration, object removal, or creative image manipulation.
Inpainting involves:
- Masking: Defining the area of the image that needs to be filled or repaired (e.g., removing an object or fixing a damaged section).
- Reconstruction: Using algorithms or AI models to generate new content that seamlessly blends with the surrounding areas of the image.
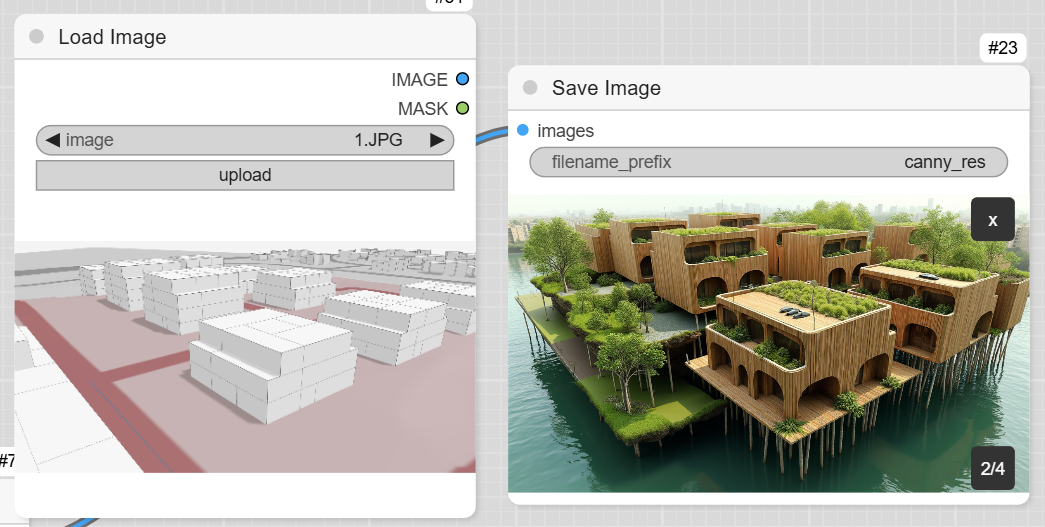
Input Image: You load the image you want to edit into ComfyUI.
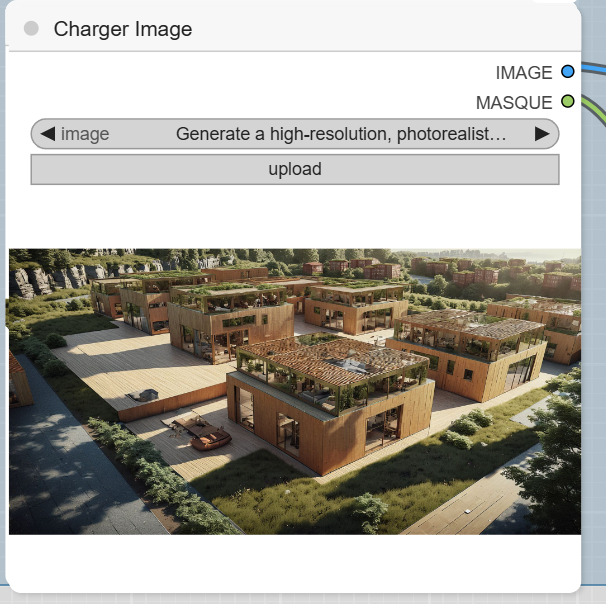
Mask Creation: One can create a mask (usually a black-and-white overlay) to specify the areas of the image that need to be inpainted. The masked area is where the AI will generate new content.
Description by prompt
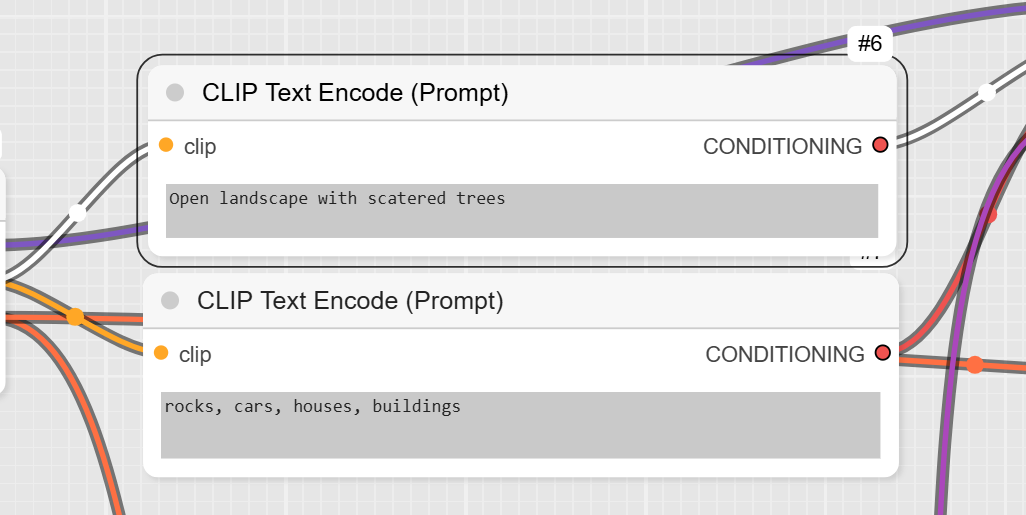
Definition
Results
Original
Output
Variation
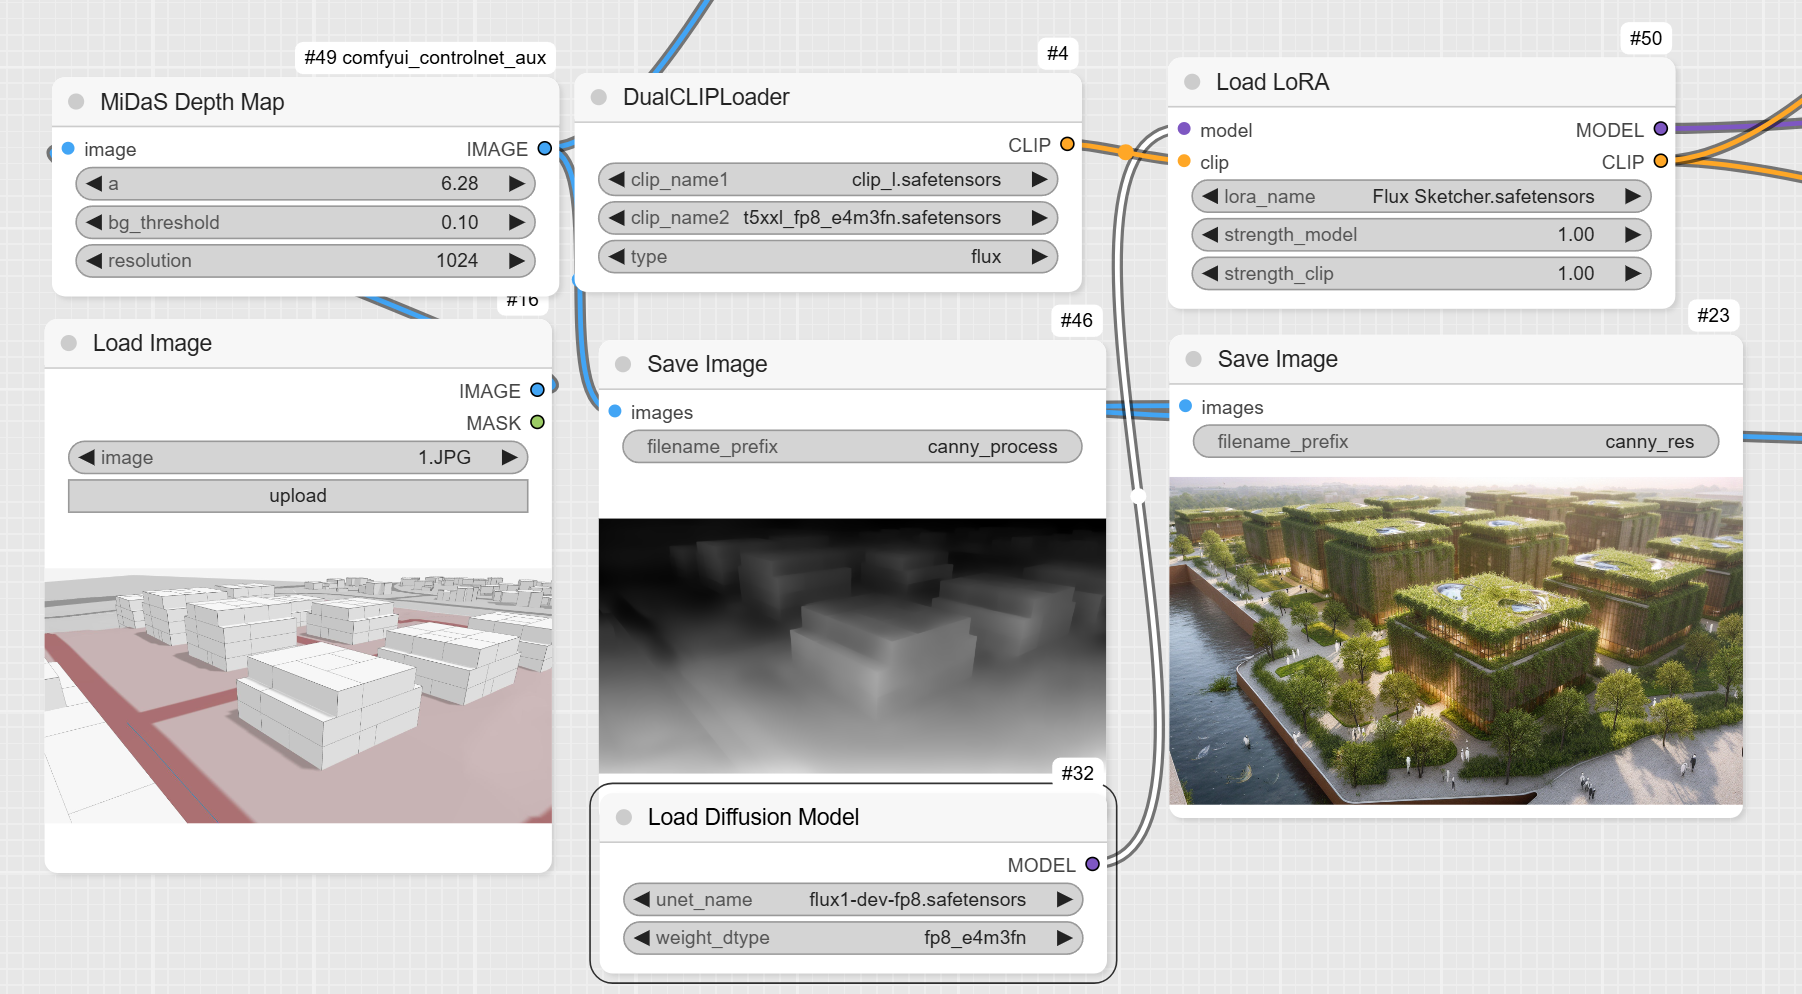
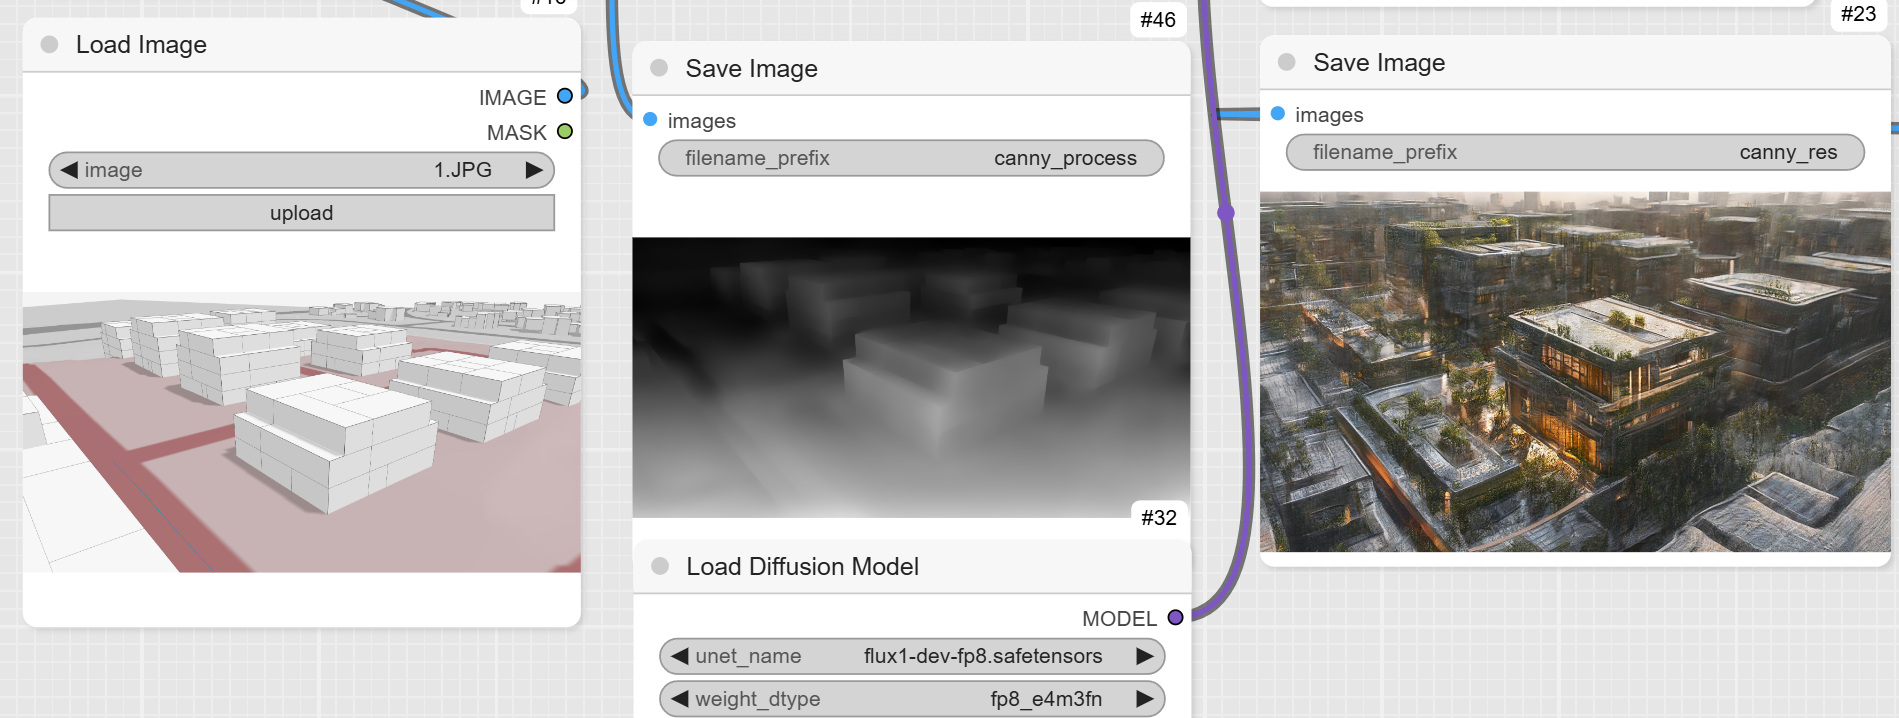
Using basic shapes and Depth map
In this workflow, a depth map is used to create an image from a basic geometry and a specific point of view.
Workflow
From the input image is calculated a Depth Map
Then the prompt
Then size and diffusion model
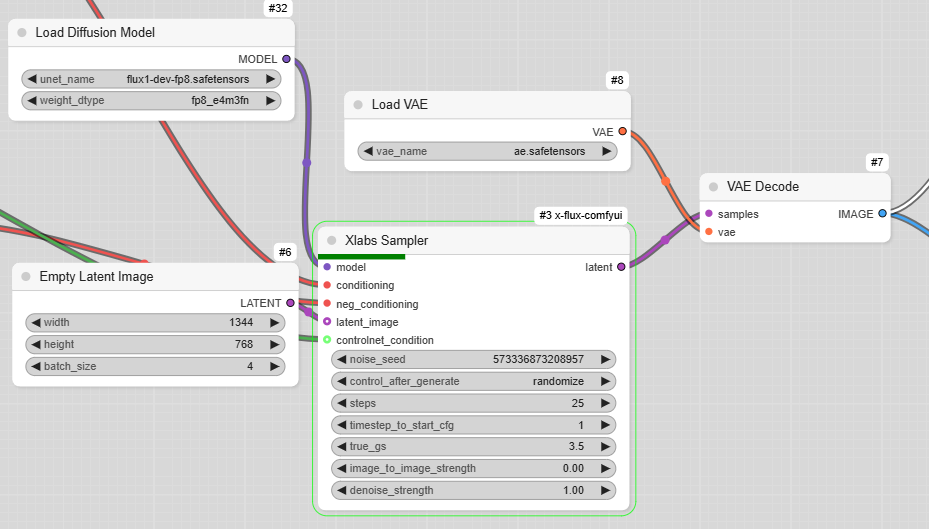
And then rendering
This is how to go from this to that
Definition
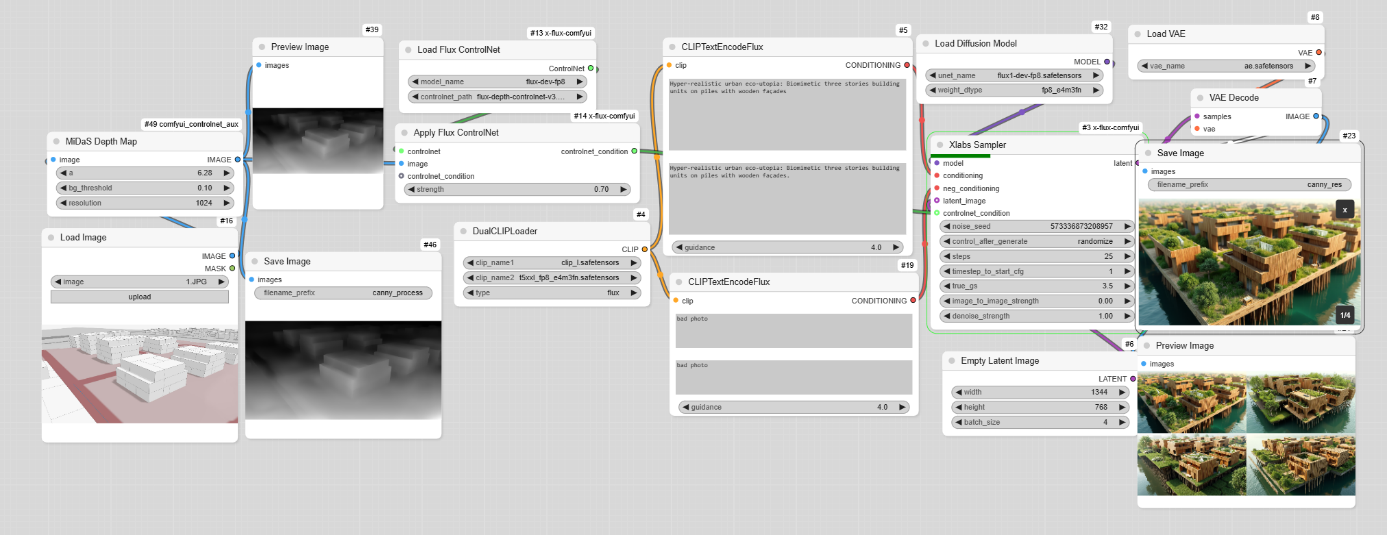
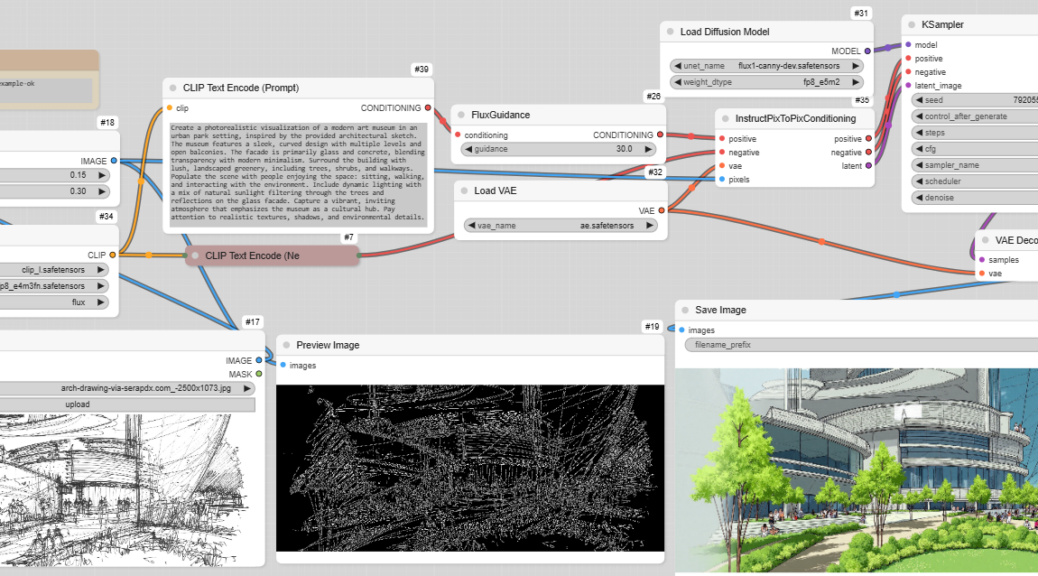
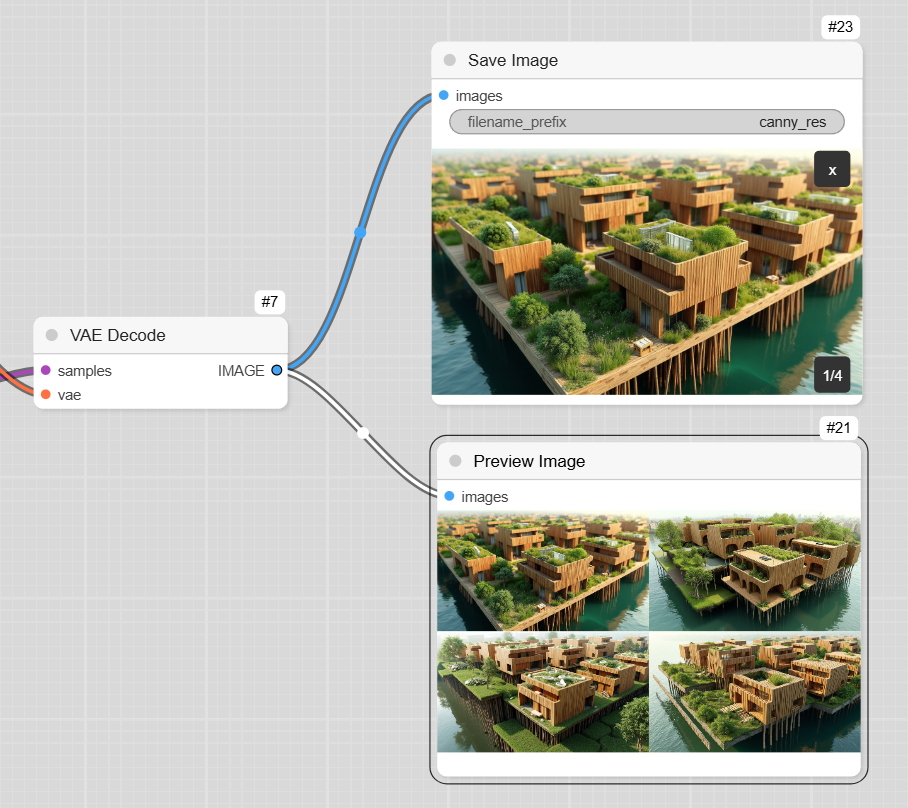
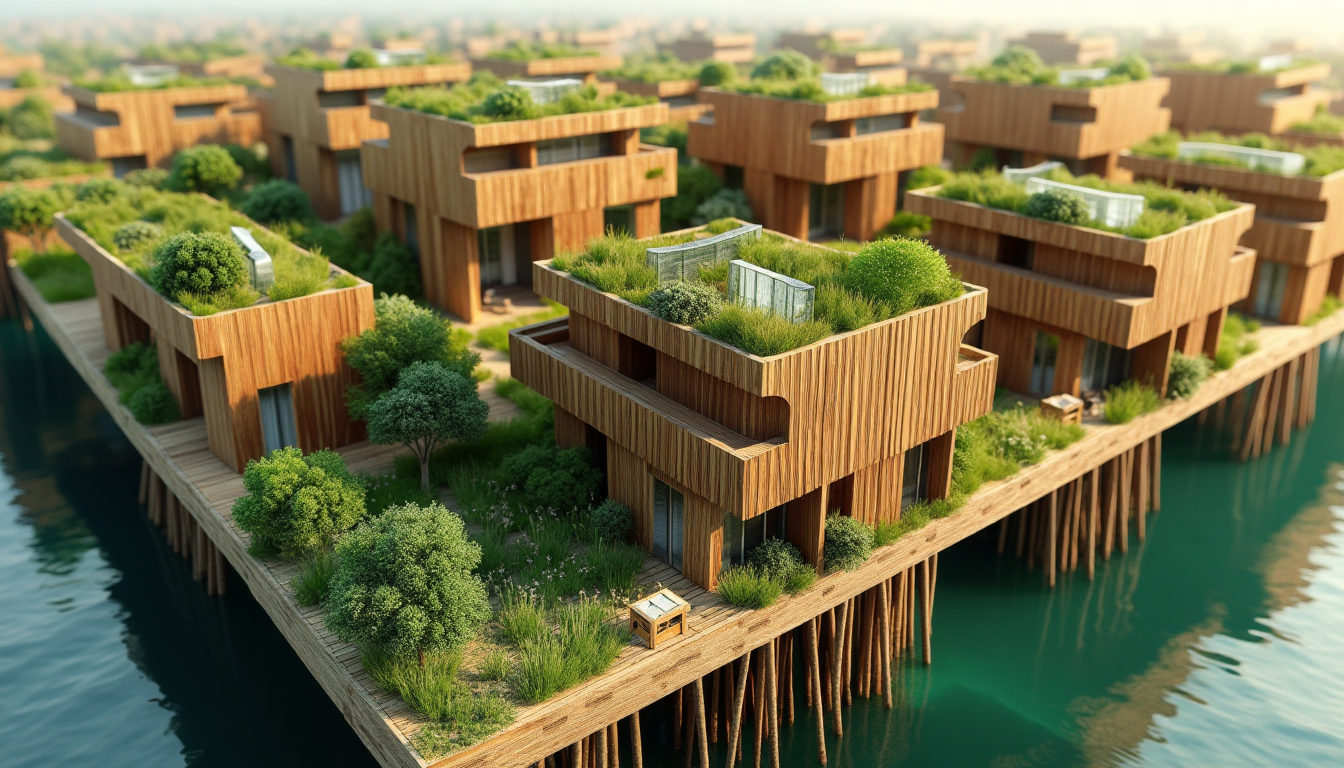
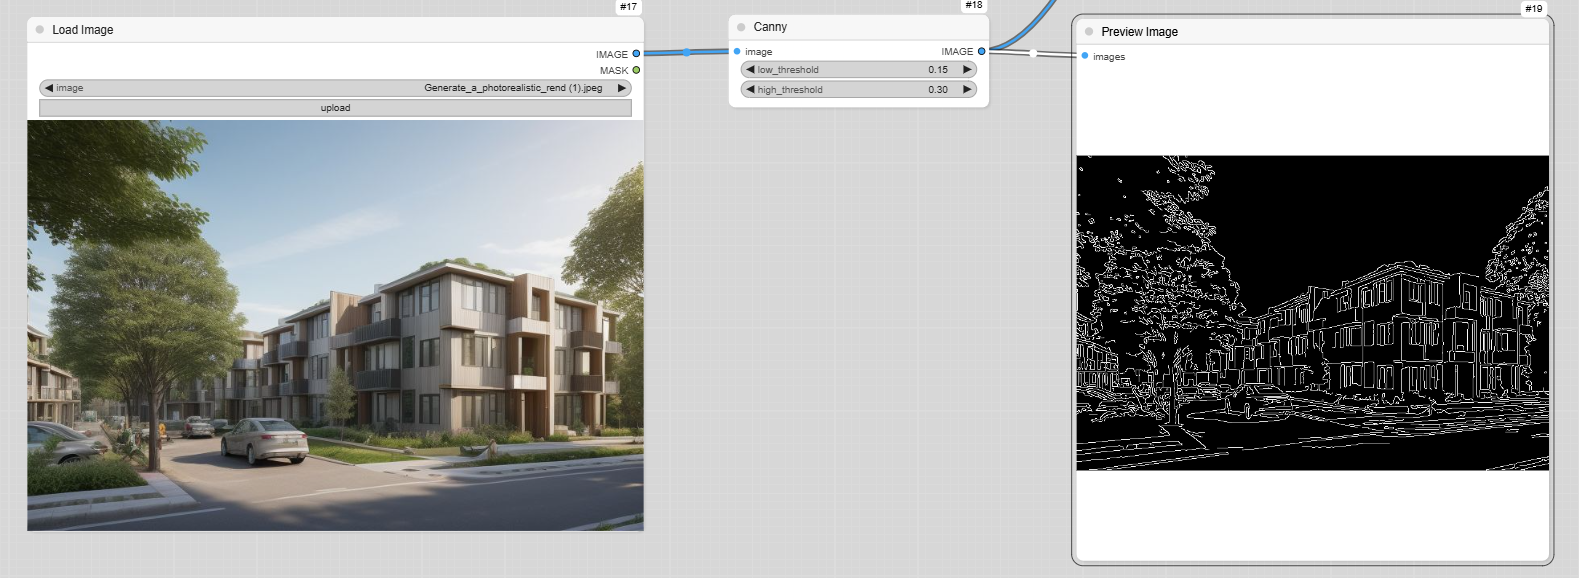
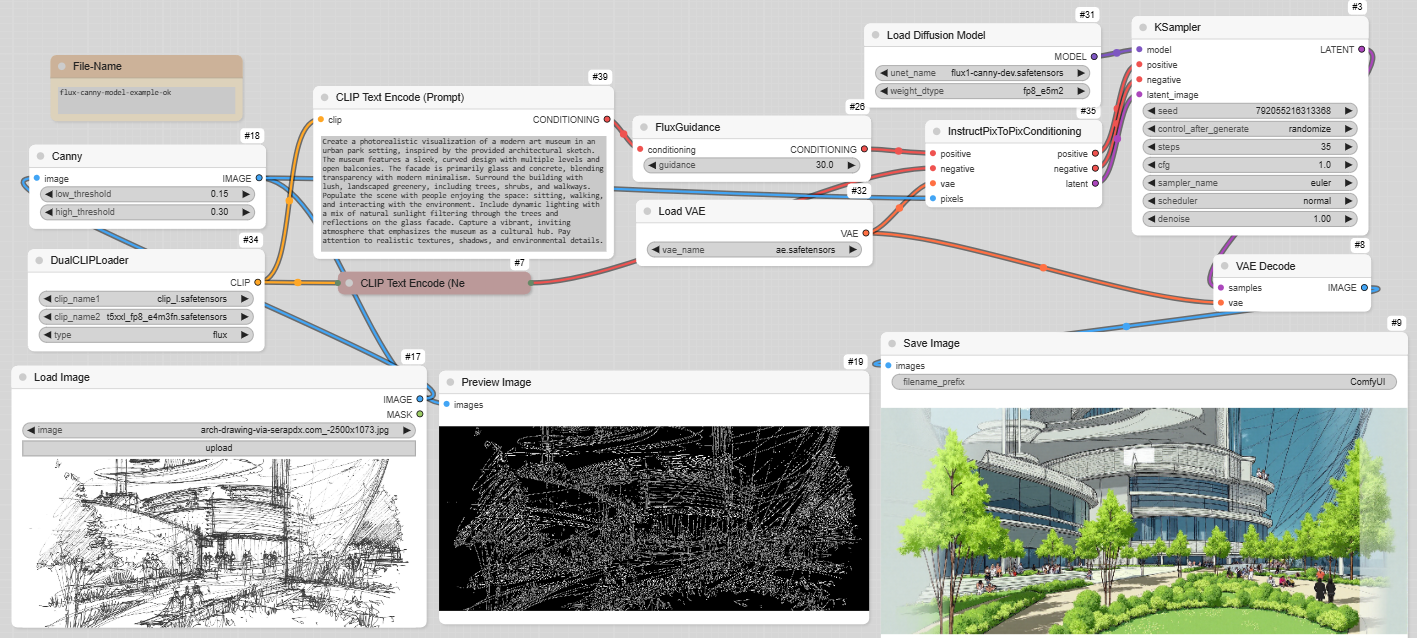
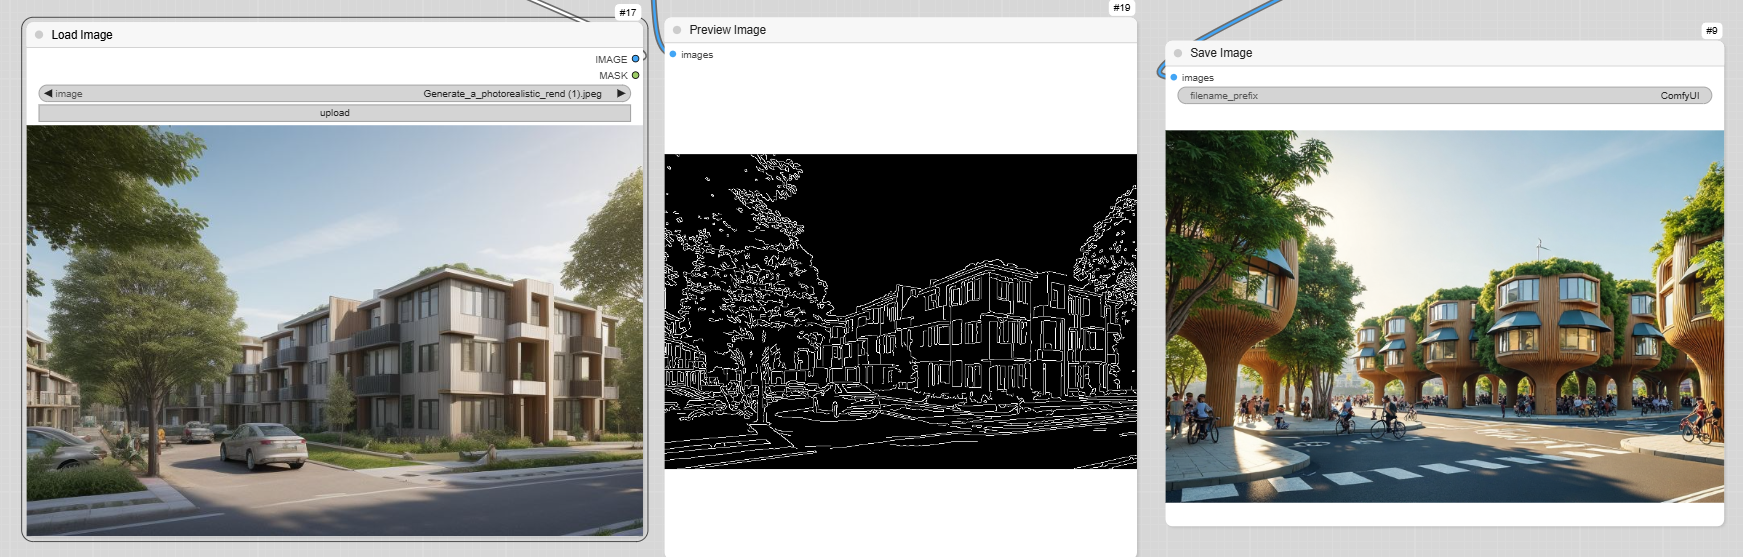
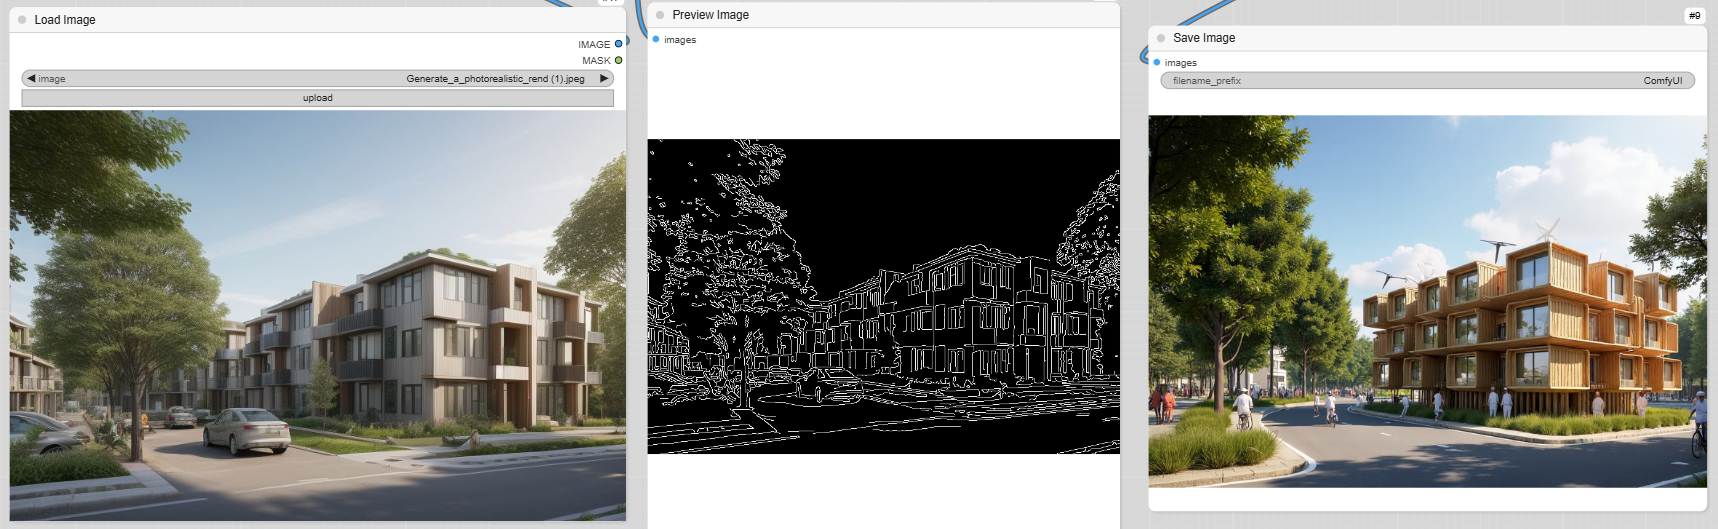
Using an image and Canny
Canny refers to a specific ControlNet model called « Canny » that utilizes the Canny edge detection algorithm. This algorithm identifies and highlights the edges within an image, enhancing its structural details. Canny is particularly useful for tasks that require object recognition or image enhancement, making it a powerful tool in various applications, such as architectural and product design.
Edge detection
Prompt for description
Definition and result

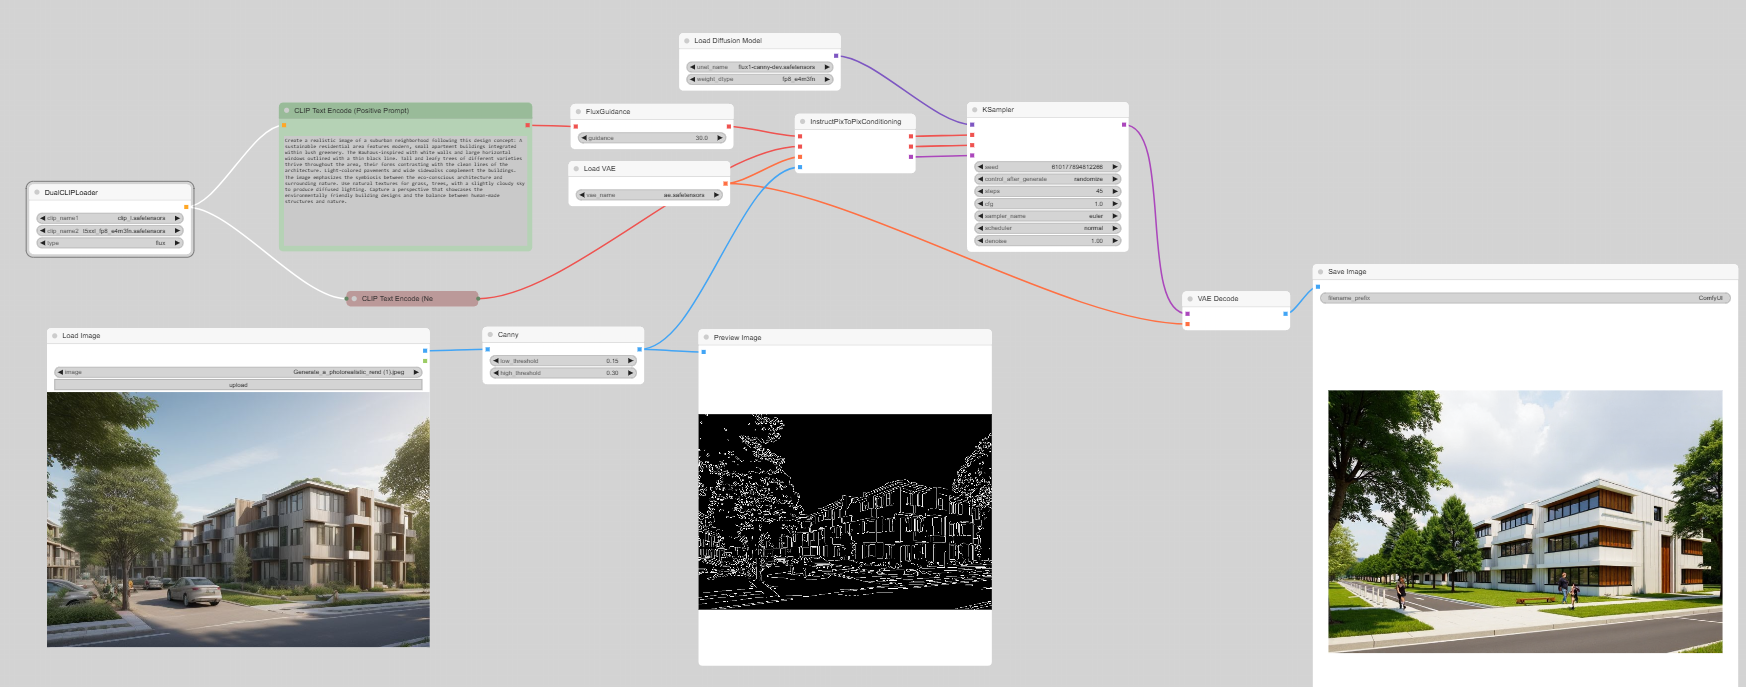
From Sketch to rendrer
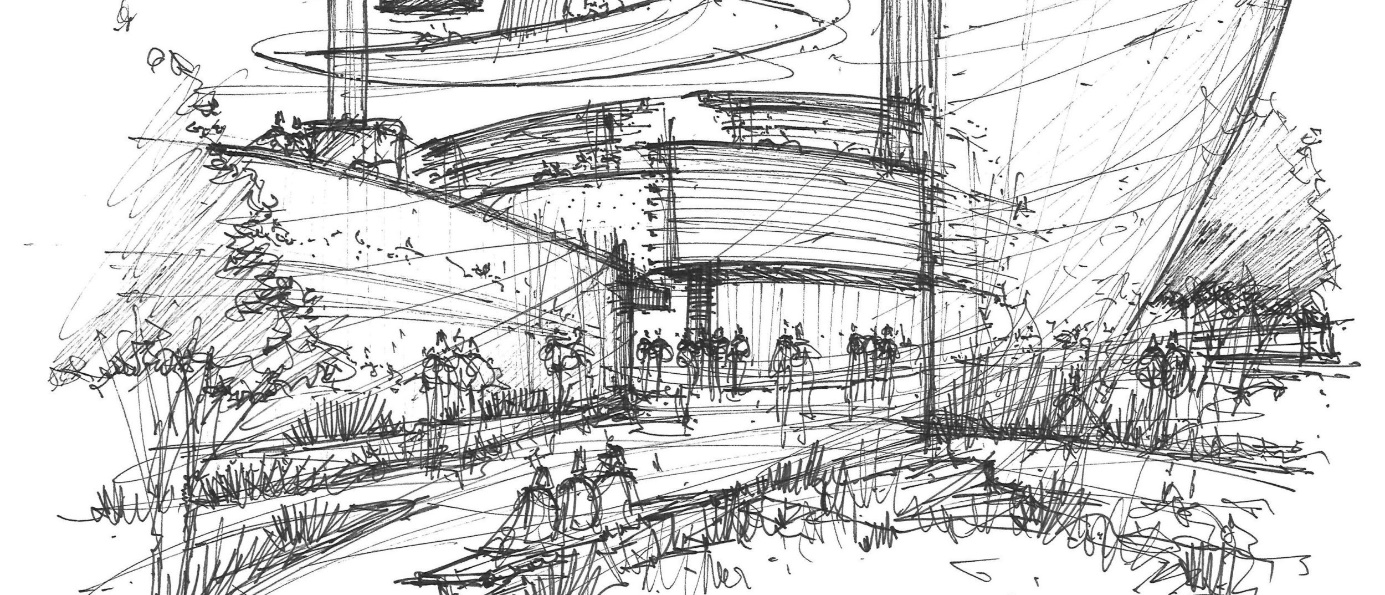
Source https://commonedge.org/drawing-should-still-matter-to-architects-and-designers/
flux-canny-model-example-ok
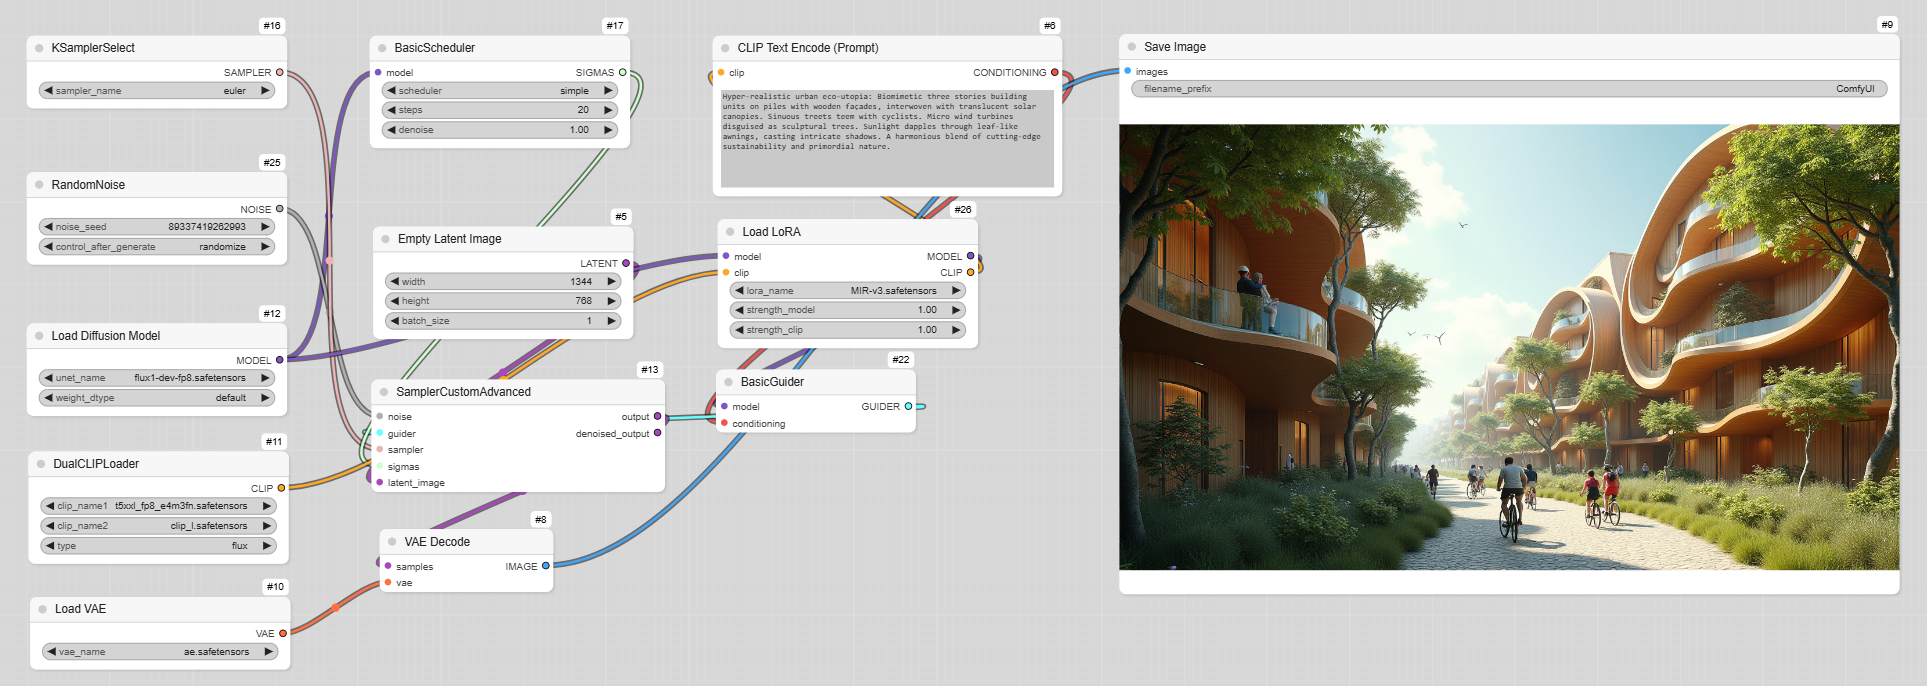
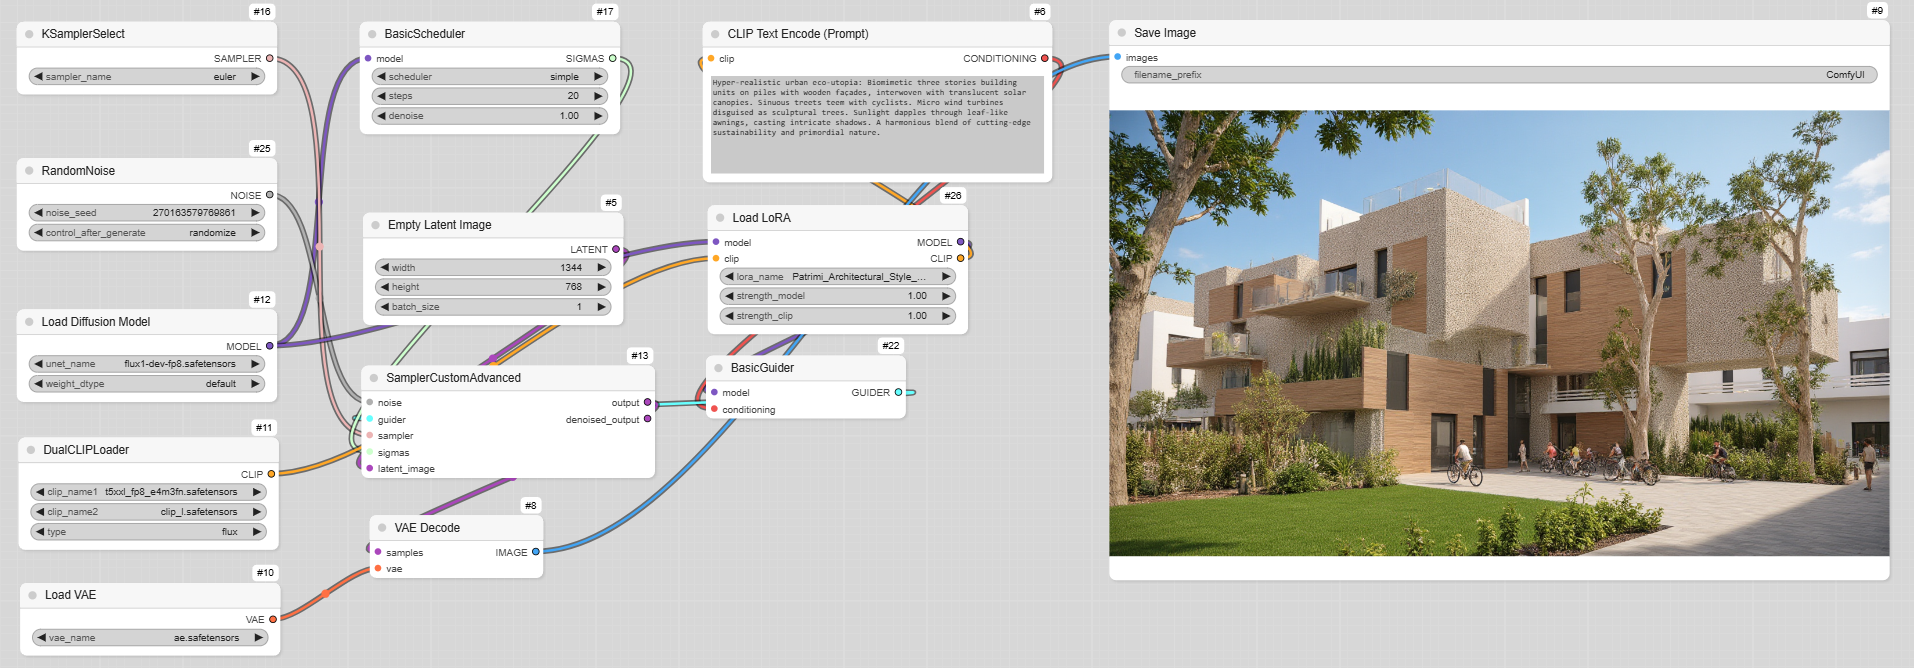
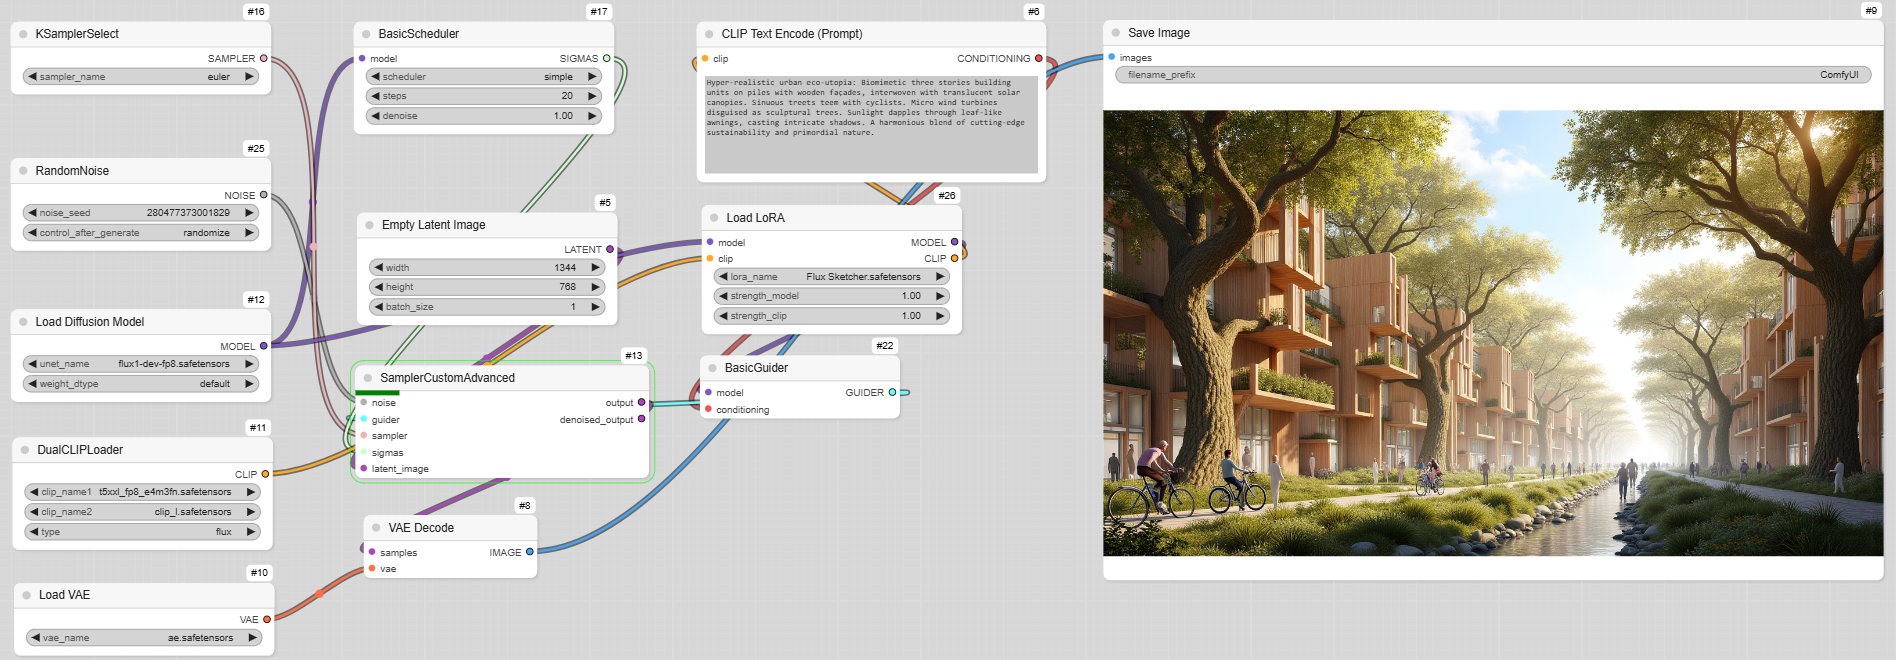
Using LoRA
A LoRA, which stands for Low-Rank Adaptation, is an efficient technique used to fine-tune large machine learning models for specific tasks or domains. Instead of adjusting all the parameters in a model, LoRA focuses on adapting a smaller subset of parameters, making the process faster and less resource-intensive. This method is particularly useful for customizing pre-trained foundation models like large language models (LLMs) and computer vision models for specialized applications.
Mir-v3
Patrimi_Architectural
Flux Sketcher
Canny and LoRA
Canny will allow to block the frame and LoRA to create in a defined style.

The LoRA Loader will be before the prompt.
MIR-V3
Patrimi_Architectural

Flux Sketcher
Hyper-realistic urban eco-utopia: Biomimetic three stories building units on piles with wooden façades, interwoven with translucent solar canopies. Sinuous streets teem with cyclists. Micro wind turbines disguised as sculptural trees. Sunlight dapples through leaf-like awnings, casting intricate shadows. A harmonious blend of cutting-edge sustainability and primordial nature.
Depth and LoRA
Same recipe to incorporate a LoRA, in the workflow.
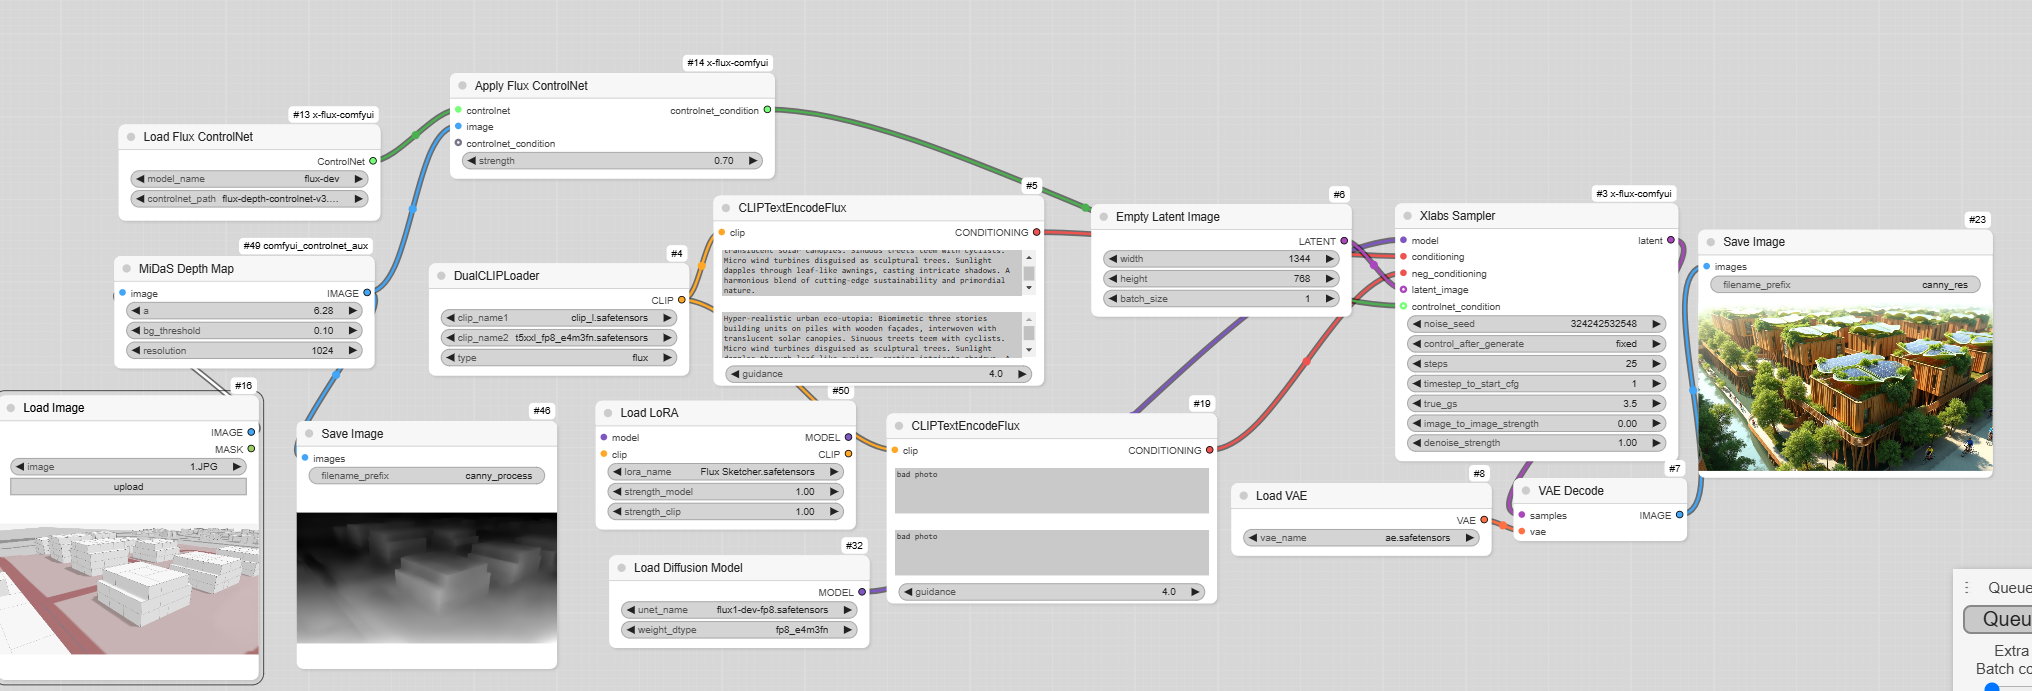
Flux Sketcher